


On this information, Michael Kent, the proficient lead stylist at Blue Tit Brixton, shares skilled ideas and strategies for creating two wonderful hairstyles that may elevate your look
Michael Kent’s professional ideas with working with afro and textured hair embrace:
- Your scalp deserves love, not punishment. Maintain it agency however cozy
- Hydrate, Hydrate, Hydrate: Moisturised hair is completely satisfied hair
- Sleep in a satin or silk scarf to maintain your knots trying contemporary
- Elastics matter: Go for clear or colour-coordinated elastics to maintain the main target in your fabulous hair
- Bubbles want quantity: In case your hair is okay, tease the sections barely earlier than tugging to offer your bubbles extra oomph
Methods to – Bantu Knots – A Step-by-Step Information


This iconic model isn’t only a coiffure; it’s a complete vibe. Whether or not you’re rocking them as a stand-alone look or unravelling them for juicy, outlined curls, Bantu knots are a flexible, beautiful look. And I’m right here to information you thru the method with love, sass, and a complete lot of favor.
Whether or not you’re hitting the membership, brunch, or simply chilling at house, this model may have you feeling just like the royalty you’re.
What You’ll Want
- Vast-tooth comb
- Rat-tail comb
- Hair clips or sectioning clamps
- Your fave leave-in conditioner or moisturizer
- Styling gel or edge management (optionally available, however we love a glossy end)
- Hair oil or butter (for shine that’ll blind them)
- Small elastics (for these cussed knots that want a bit additional love)
Step 1: Prep That Hair
First issues first begin with clear, detangled hair. Bantu knots work on any hair texture, however barely damp hair is the place the magic occurs. Seize your leave-in conditioner or moisturizer and work it by means of your hair such as you’re feeding it life. Hydration is non-negotiable.
Step 2: Part
Utilizing your rat-tail comb, half your hair into sections. The scale is as much as you – smaller sections offer you a cute, intricate look, whereas bigger sections scream drama and boldness. Safe every part with a clip so that you’re not preventing stray strands when you work.
Step 3: Clean It Out
Take a second to indicate every part some love. Add a little bit of styling gel, butter, or oil to maintain issues easy and frizz-free. Run it by means of together with your fingers or a comb till your hair is softer.
Step 4: Twist It Up
Seize a bit and begin twisting from the roots to the ends. Maintain it tight, however don’t overdo it—we wish snatched, not burdened.
Step 5: Knot It
Right here comes the enjoyable half: take that twist and wrap it round itself on the base to kind a knot. Maintain wrapping till you’ve received a cute little bun sitting fairly. Tuck the ends beneath the knot, and if it’s flying away, safe it with an elastic.
Step 6: Repeat
Work your approach by means of all of the sections, taking your time to make every knot flawless. Professional tip: play some Beyoncé or Doja Cat when you’re at it – it helps with the vibe.
Step 7: Set and Neglect (For Now)
When you’ve received all of your knots in place, allow them to air dry or sit beneath a hooded dryer for those who’re in a rush. Need to make it additional glossy? Wrap your hair with a satin or silk scarf.
Step 8: Rock the Knots or Launch the Curls
You possibly can put on your Bantu knots as-is, or you may unravel them for bouncy, outlined curls. While you’re able to take them down, be light – separate the curls together with your fingers and fluff…
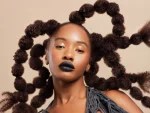
Methods to Work Bubble Braids – A Step-by-Step Information

Bubble braids are the second, they’re playful and stylish. Whether or not you’re channeling Y2K vibes, hitting a pageant, or simply feeling additional fabulous, this model is ideal for turning heads. And guess what? They’re simpler to do than you suppose. So seize your instruments, flip up the music, and let’s get you bubblelicious!
What You’ll Want
- A paddle brush or wide-tooth comb
- A rat-tail comb
- Hair elastics (a bunch)
- Hair gel or pomade (for sleekness and management)
- Hair mousse or volumizer (optionally available for additional oomph)
- A little bit of hair oil for shine
Step 1: Prep Like a Professional
Begin with clear, detangled hair. Bubble braids work on any hair sort, however if you’d like most drama, blow out your hair or stretch it first. Add a bit mousse or volumiser for additional fullness – this model thrives on quantity.
Step 2: Half It
Determine what number of bubble braids you need. A single dramatic braid down the middle? Two for that basic vibe? Or a number of braids? Use your rat-tail comb to half your hair accordingly. Safe the sections you’re not engaged on with clips.
Step 3: Slick and Snatch
Apply a little bit of gel or pomade to your roots for a glossy end. Use a brush to easy every thing out as a result of we wish polished, not messy. Tie off your first part with an elastic – that is the beginning of your braid.
Step 4: Begin Effervescent
About an inch or two down from the primary elastic, add one other one. As soon as it’s secured, gently tug the hair between the elastics to create that bubble impact. That is the place the magic occurs. The larger the tug, the puffier the bubble – so go massive or go house!
Step 5: Repeat, Repeat, Repeat
Maintain including elastics at equal intervals down the size of your hair, tugging to create bubbles as you go. Make certain your spacing is constant for a clear, skilled look. Don’t be shy about adjusting the bubbles.
Step 6: Add the Drama
As soon as all of your bubbles are in place, end with a contact of hair oil for shine. Need to go additional? Add equipment like beads, ribbons, and even glitter. That is your probability to make it private, so let your creativity shine.
Step 7: Lock It In
Mist your hair with a light-hold hairspray to maintain every thing in place. If you happen to’re heading out, toss a mini bottle in your bag for touch-ups. We don’t do deflated bubbles round right here.
PHOTOGRAPHY BY STEFAN FOSTER (@STFNDOCS) | ASSISTED BY KUSH (@KSHRN_) | HAIR BY MICHAEL KENT (@MICHAELKENT_HAIRDRESSING) AT BLUE TIT BRIXTON | ASSISTED BY KATIE HUGHES (@ITOUCHHAIR) | MAKE-UP BY MARY JANE GOTIDOC (@MARYJANEGOTIDOC) | MODELS: KENTHA (@KENTHAKIREZI_) | EVE (@EVEVINCEODOZI) | BRIA RENEE (@BRIARENEEE) | ADAR (@ADARAALIYAH)